Saturday, March 31, 2012

The Three Arms

Here's another piece I made for a mid-term project in Texture and Lighting. When I finish the arm cast model in ZBrush, I position the arm cast in this phrase: left, front, and right. I then went to document on the top of the screen, and click Z Applink.  Under Z Applink Projection, I click on Drop Now and load each position into it's own Photoshop file. I then click ok on the Z Applink to finsh the process.

The first one I made was just the regular arm cast model that I made in ZBrush. The other three were just seperate projects I made to make them different from the regular arm cast model.

  
Here're the other three that I made in Photoshop for this project:

The Three Arms Blood

The Three Arms Stiches

The Three Arms Tatoos

Arm Cast

Here's a project I made for a mid-term project in Texture and Lighting. I start off using a cylinder and use the insert edge loop tool to define the shape of the arm. I then made a hand in a seperate file using a cube. I use the insert edge loop tool, and made a finger using a cylinder. I duplicate the four fingers and delete the faces of the hand. I deleted the faces in one of the fingers to create a thumb. I attach both the fingers and thumb to the hand. I import the hand into the arm file and attach them together. I select the faces for both the hand and the forearm. I then extrude the faces to create a arm cast.


I then export the arm cast model into ZBrush and did some scuplting and texturing on the arm cast.


The model was then export it back to Maya and apply texture map that I made in ZBrush.

Note: I somehow misplace the arm cast model that I export it from ZBrush since I don't know where it has gone to. Luckly I still have the texture, normal, and displacement maps that I made in ZBrush.


Ladybug Lying Down

Here's another piece I made for my final in Texture and Lighting.When I had finish sculping and texturing in ZBrush, I arrange my model by positioning in the top view. I then went to Document in the top of the screen and click on zApplink. Under Z Applink Projection, I click on Drop Now and my project was loaded to Photoshop. I then click ok to finish the process. I searched in Google and I found myself a leaf wallpaper to go with my project. I then open the leaf wallpaper in Photoshop. While I'm in Photoshop, I went back to my ladybug model and use the pen tool aroung the ladybug. I then brought up the selection change and inverse it to delete the background. I then place the ladybug onto the leaf wallpaper. I use the pen tool, made a selection change, and apply a dark red color on the sides of the elytra. I then use a brush and use red to paint on the inner parts of the elytra. I switch the brush to a splatter brush, use black as a color of choice, and tone down the opacity to paint around the elytra. I merge the layers to create a complete texture of the ladybug. I then use the free transform and select Distort to make it look like the ladybuy is moving in a 3 dimensional view. Once it's done, I duplicate the ladybug and made a shadow out of it. I placed the shadow layer on bottom of the ladybug layer so it makes it look like the ladybug has a shadow underneath. Just to finish things off, I duplicate both the ladybug and the shadow to have another ladybug in the picture.
       

Ladybug Lighting

After when I exported the ladybug model back to Maya, I set up a stand for the ladybug to place on top of using a cylinder.


I then duplicate the stand and scale it for a larger size. I then use a sphere by scaling it larger, and delete the half to create a dome.


From the inside of the dome, I had place a series of cameras to shoot for the ladybug. I use two directional lights in the front and back of the ladybug, and place in two ambient lights on the bottom of the ladybug and stand. I even made adjustments in the Relationship Editor to see how I want each camera to shot the ladybug.


I was using the Render View along with the Attribute Editor to make the adjustments with the lights. The scene is sort takes place in a sunny day where the ladybug is sitting on a grassy area like on a leaf. I then went to Render Settings and made these settings:

Common

File Output:

Image Format: JPEG (jpg)

Frame/Animationext: name.ext(Single Framed)

Renderable Cameras

Renderable camera: persp

Image Size:

Presets: 2K Square

Maya Software

Anti-aliasing Quality:

Quality: Production Quality

Edge anti-aliasing: High Quality

I then render the scene and save it as a jpeg. By the time I had finish rendering, I ran in to some issues with the scene I took from the ladybug. It turns out that it's a little beat up, altough it doesn't look too bad. So I open the jpeg in Photoshop and make these adjustments. I had use the smuge, clone tool, and a little of paint to fix the problem. It's starting to look a little better, but that's the least I could do. And here's how it turns out:


Ladybug

Here's a project that I was doing for my final in Texture and Lighting class. I started off modeling the bug in Maya using a sphere polygon for the elytra. I then use another sphere polygon and delete the other half for the abdomen. I place the abdomen under the elytra and extrude the face, legs, and whiskers. I also made the pronotum using a cube polygon and place it on top of the ladybug's head and elytra. I then had exported the ladybuy into ZBrush.


So I had brought the model over to ZBrush where I did so much sculpting and texturing.


I then export the model back into Maya and apply the texture map I made in ZBrush. And the results for the model turnout like this:

Ladybug Perspective

Ladybug Top

Ladybug Bottom 
   

Friday, March 30, 2012

LB_Warehouse_Level

Here's a project I made for my Game Design Project 3 where I had the advantage on using the Unreal Editor. The project start off in Maya where I had model alot of objects for the level. The textures were done in Photoshop where I did most of the uv mapping that was brought over from Maya. The fences for the warehouse were done by applying a alpha mask in Photoshop and save it as a 32 bit. When I was done applying textures in Photoshop, I exported them back to Maya where the objects had textures applied to them. I had made a export selection of each objects by exporting them as fbxs. so I could bring them to UDK Editor as static meshes. I open the existing psd files that I made and save them as targas. The difference is that everything else is being save as 24 bit. I took the targa files to Crazybump where I get to adjust and apply them as normal and specular maps. I brought the specular maps into Photoshop where I made some adjustments using the contrast. At the same time, I use the quick selection tool and copy the specular maps. I open up the normal maps in Photoshop and paste the specular maps as alphas under channel. I open up UDK and created new packages. I made each package for static meshes, materials, textures, and particle effects. Here's what I have so far:
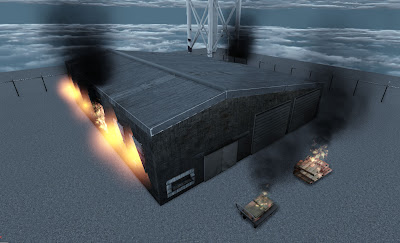
     Warehouse

 Throughout the time making the level, I made volumes that are use to block paths, jumping on objects and rooftop, gravity to jump off the platform, and cause damage to the player.

Garbage Disposal

 Ladder, Cargo Containers,and Wooden Crate Boxes

 Jamp Path


Watertower

I had made collisions that are use for rigging objects for shooting, grabbing, throwing, knocking, and opening gates.

Gate Entrance

I was using wooden crate boxes throughout the level where I also used them as platforms to make it challenging for the player to reach up the cargo containers.


I was making expressions in the material editor in UDK where I had to apply textures, and normal maps to make a series of burning wooden telephone poles.


To add even more firing fun, I added particle effects on top of the crates and boxes in which the textures, and normal maps had been applied the same way like the telephone poles. The fire particle effects were applied on the wooden windows from the warehouse as well. I also had added the physic volumes on the crates, telephone poles, wooden crate boxes, and wooden windows where the player would come across to cause damage. When the player gets damage, a red blood effect would appear on screen.


I made a light pole emissive in Photoshop and brought it over to the material editor in UDK so that it makes it look like the light is coming from the lightbulb. 

In the end of this project, I had place a PlayerStart actor in front of the entrance gate where the player could start from, along with a kimset sequence showing the introduction of the level when the game is being played.